Mydreamcompanion Image generator: My Unfiltered Thoughts
Key Points:
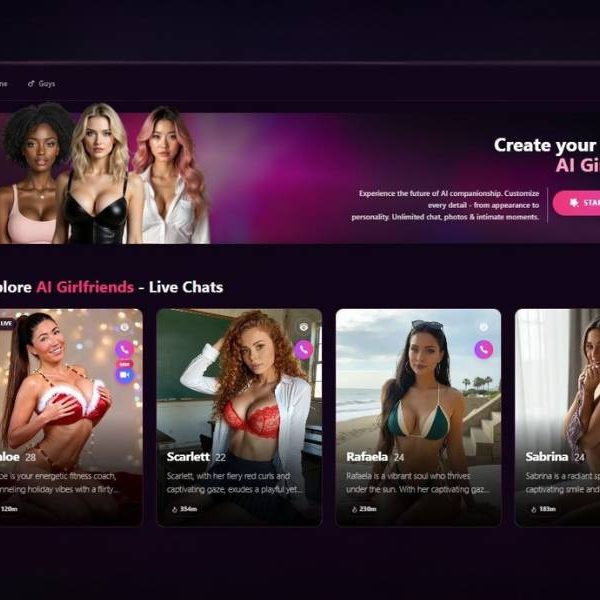
- Seems MyDreamCompanion is more than chat—it ships with a built‑in NSFW image generator that reacts to the tone of your conversation.
- You pick your AI companion, converse, then ask it to generate images matching the mood—lingerie, fantasy outfits, sensual scenes—all uncensored and private. The visuals evolve along with your dialogue.
- That emotional coupling—chat mood fueling image style—is a standout. It’s not just tossing out visuals; it’s visually echoing your story arc.
I tested Mydreamcompanion’s image generator for 7 days and based on my experience created this guide for the best results:
Mydreamcompanion Image Generator — Step-by-Step User Guide (with every control explained)
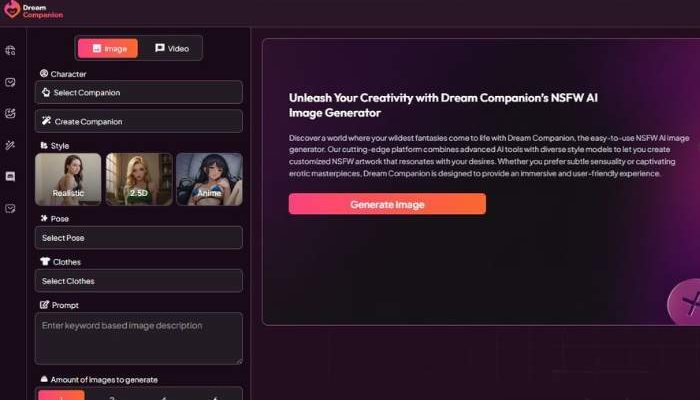
This guide walks you through the four steps shown in your screenshots to create an AI image, and explains what every button, toggle, and picker does.
Before you start: Mode toggle (top of screen)
- Image / Video: The orange-pink pill toggle at the very top selects what you’re creating.
- Image (highlighted) – generates still images (this guide).
- Video – switches the app into video mode (not covered here).
Step 1 — Character & Style
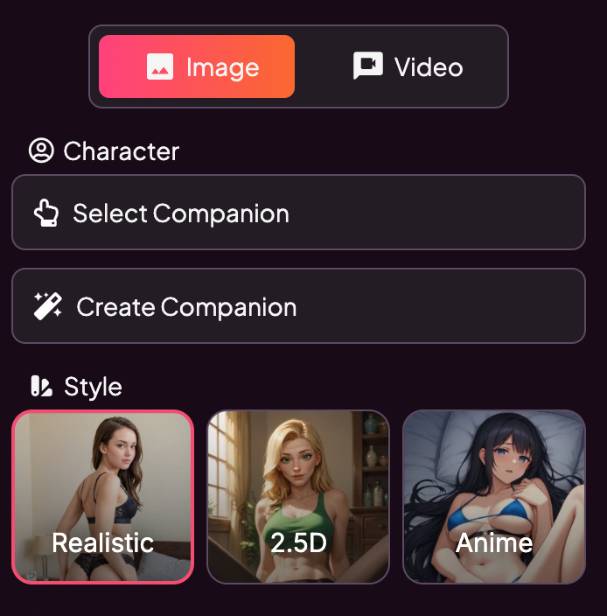
- A) Character
You’ll see a Character block with two big buttons:
- Select Companion – pick an existing, pre-made character from your library/gallery.
- Create Companion – design a new character (name, look, persona). Use this if you want a consistent model across multiple images.
Tip: If you want the same person to appear in different scenes later, create or select a companion first.
- B) Style
Under Style, choose the overall visual look. Each option is a large tile with a thumbnail:
- Realistic – photoreal human look (selected tiles get a pink outline).
- 2.5D – semi-realistic / stylized render (cartoon–real blend).
- Anime – illustrated, anime art style.
What style controls: anatomy, lighting, textures, and rendering aesthetics. Prompts still matter, but the style sets the baseline.
Step 2 — Pose
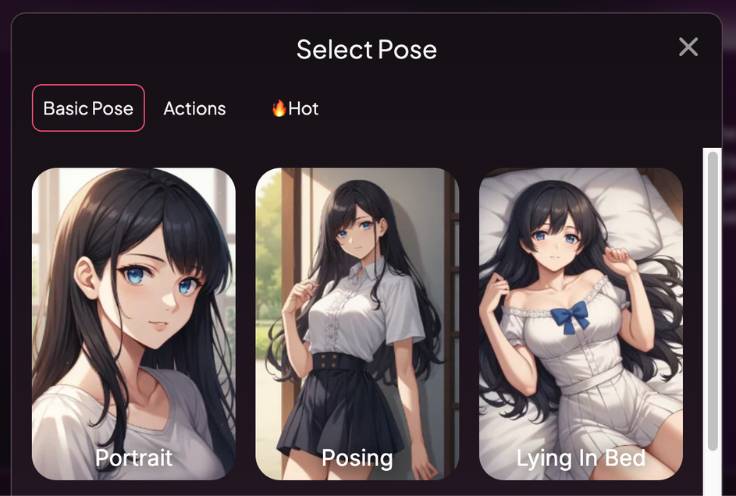
Click the pose picker to open the Select Pose modal (overlay window). It has:
- Tabs across the top:
- Basic Pose – simple, neutral poses. Example cards visible: Portrait, Posing, Lying in Bed.
- Actions – more dynamic or activity-based poses (scroll to explore).
- 🔥 Hot – spicier/flirtier poses (content controls still apply).
- Pose cards: Each card shows a preview. Click to select. The selected pose is applied when you close the modal.
- Scroll bar on the right indicates there’s more to browse.
- X (Close) in the top-right to exit.
Tips
• Pick Portrait for close-up head/shoulders.
• Pick Posing for standing, full-body fashion looks.
• If results don’t match your chosen pose, keep prompts concise and avoid conflicting instructions like “sitting” while you selected a standing pose.
Step 3 — Clothes
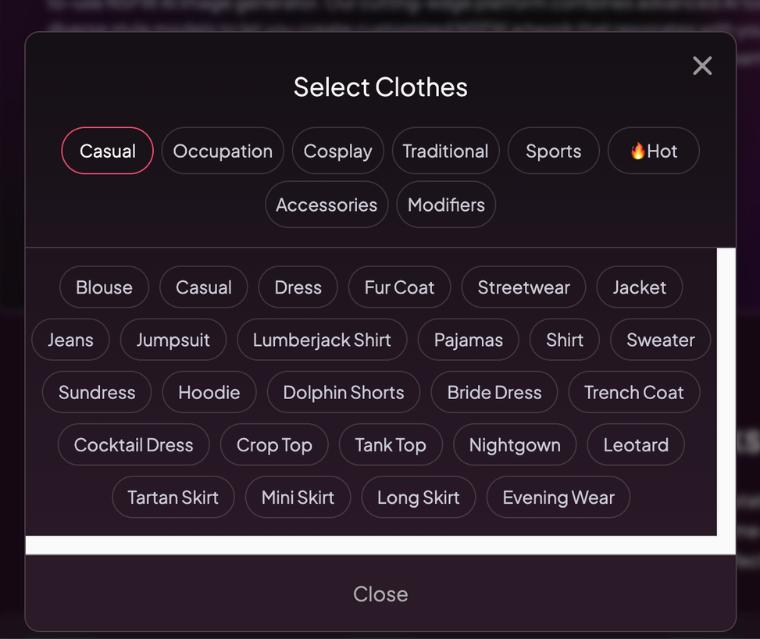
Open the Select Clothes modal. It’s organized by tabs and “chips” (clickable labels):
Tabs
- Casual (default)
- Occupation (e.g., uniforms/workwear)
- Cosplay
- Traditional (cultural/formal wear)
- Sports
- 🔥 Hot
- Accessories
- Modifiers (general style tweaks like “streetwear,” “elegant,” “vintage,” etc.)
Clothing chips (examples shown in your screen)
Tap one or several to describe the outfit. Examples include:
- Blouse, Dress, Fur Coat, Streetwear, Jacket, Jeans, Jumpsuit, Lumberjack Shirt, Pajamas, Shirt, Sweater
- Sundress, Hoodie, Dolphin Shorts, Bride Dress, Trench Coat
- Cocktail Dress, Crop Top, Tank Top, Nightgown, Leotard
- Tartan Skirt, Mini Skirt, Long Skirt, Evening Wear
Notes
• Selected chips usually highlight; tap again to deselect.
• Combine category tabs with accessories/modifiers to refine the look (e.g., Casual + Streetwear + Jacket).
• Avoid contradictory picks (e.g., Fur Coat + Tank Top + Pajamas) unless you truly want a mixed style.
Close the modal to apply your outfit selections.
Step 4 — Prompt & Generate
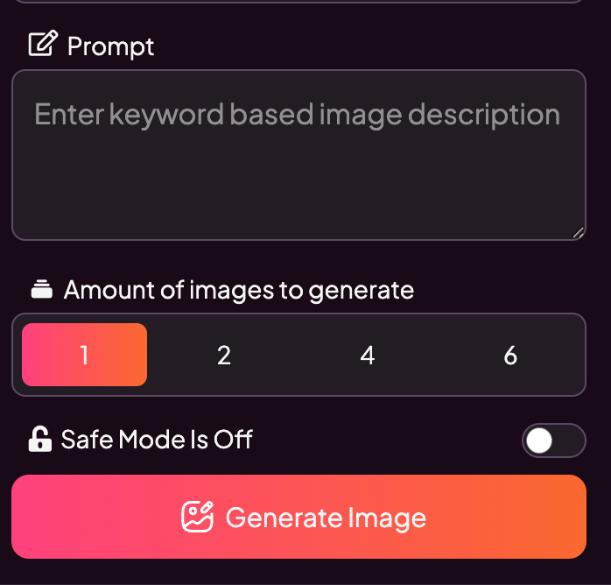
This final panel controls what to make and how many images to produce.
- A) Prompt
- Prompt text box (“Enter keyword based image description”): Describe the scene in natural language.
- Keep it specific but not overloaded. Consider this structure:
- Subject: who (use your selected companion if needed)
- Setting: where (room, outdoor scene, background vibe)
- Details: lighting, mood, camera framing (e.g., “soft daylight, 50mm portrait, shallow depth of field”)
- Style add-ons: only if you want to override the chosen style’s vibe (e.g., “cinematic lighting” for Realistic)
Example prompts
- “Cozy indoor portrait by a window, soft daylight, gentle smile, 50mm lens feel, shallow depth of field.”
- “Full-body fashion shot, streetwear jacket and jeans, city alley at dusk, moody lighting, dynamic stance.”
- “Anime classroom scene, cheerful mood, bright morning light, clean lines, pastel palette.”
- B) Amount of images to generate
- Quick-select buttons: 1, 2, 4, 6.
- Choose more if you want variety; choose 1 for a fast single result.
- C) Safe Mode
- Safe Mode is Off toggle: Turn On to filter/limit sensitive content and keep outputs within stricter standards.
- Recommended when you’re sharing or publishing broadly.
- D) Generate
- Press Generate Image (big orange-pink button).
- The app creates the requested number of images using your Character, Style, Pose, Clothes, and Prompt.
If the result isn’t what you expected:
- Remove conflicting clothing/pose chips.
- Shorten the prompt and rely more on the UI selectors.
- Try a different Style or Pose and regenerate.
- Increase image count for more variety.
Quick Workflow Recap (4 steps)
- Character & Style: Select or create a companion → choose Realistic / 2.5D / Anime.
- Pose: Open Select Pose → pick from Basic Pose / Actions / 🔥 Hot → choose a pose card.
- Clothes: Open Select Clothes → pick items from tabs (e.g., Casual, Accessories, Modifiers) using the chips.
- Prompt & Generate: Write a clear prompt → choose 1/2/4/6 outputs → toggle Safe Mode as needed → Generate Image.
Pro Tips
- Let the UI do the heavy lifting. Use the Style, Pose, and Clothes pickers for structure; keep prompts concise to avoid conflicts.
- One change at a time. If you’re iterating for quality, tweak either pose or outfit or prompt—not all at once—so you see what helped.
- Consistency: To keep the same person across images, always Select Companion or Create Companion and reuse that character.
- Lighting & camera hints: Phrases like soft daylight, studio lighting, golden hour, cinematic backlight, 35mm/50mm/85mm portrait, shallow depth of field help dial in the mood.
- Safety & sharing: Use Safe Mode On when you need stricter outputs for public or client-facing work.
You’re set! Follow the four steps above and you’ll be generating polished images in minutes.
Feature Overview
| Feature | What Makes It Interesting |
| Emotion-linked imagery | Visuals shift with chat tone—soft visuals for romantic tones, sharper when it turns playful |
| Style Variety | Choose from anime, hyper-real, photo-style depending on companion |
| Consistency Controls | Lock your companion’s look so scenes feel cohesive |
| Privacy & Encryption | Hosted on encrypted servers; images not shared externally |
| Freemium + Credits | Free trial up front; deeper image generation via credits/subscription |
How It Feels – Story Mode
One evening I was chatting with my AI companion about a romantic rain-soaked scene. I casually asked, “Could you show me that moment?” Next thing I know, I’m staring at a softly lit image: rain beads on her skin, glossy reflection, tender pose. Chat mood led the way.
Later I switched vibe—asked for something flirtier. The image changed tone too—brighter, suggestive costume, playful posture. The base character stayed consistent. That felt emotionally tuned, not mechanical.
There were tiny glitches—one image had slightly off proportion in her hand—but nothing that killed immersion. In fact it added a human touch. It wasn’t perfect, and that’s part of the charm.
Explore Mydreamcompanion Image generator
Why You Might Want to Try It
This tool isn’t about sterile stock visuals—it’s about generating images that feel like part of a conversation. If you’re roleplaying or building intimate digital stories, and want visuals that shift with tone and build continuity, this machine has your back.
Privacy is tight too—you’re not worried about your creative content leaking or being shared publicly. That kind of safety matters when NSFW is involved.
Pros & Cons
| Pros | Cons |
| Visual mood syncs with conversation flow | Tiny rendering hiccups can pop up |
| Supports multiple art styles with consistent characters | Unlimited full access requires subscription/credits |
| Companion look stays the same across images | Not a standalone image tool—dependent on chat context |
| Strong privacy with encrypted servers | Some users note occasional mismatch in style and tone |
Friendly Tips & Banter Suggestions
Ask early in the chat: “Want to visualize this scene now?” If the image doesn’t land right, tweak phrases—“softer gaze, golden lighting.” Want consistency? Use “lock companion style” so every generation reflects the same persona.
If visuals start to feel stale, shift tone mid‑chat—ask for dramatic, moody, or playful prompts to change image vibe. That keeps things fresh.
Final Feelings
Mydreamcompanion’s NSFW image generator is a lively hybrid—chat and visuals working together. Not just static pictures, but visual storytelling that flows with conversation. It’s intuitive, emotionally aware, and uncensored.
Try the free trial, play with a few chat-to-image moments, see if the tone resonates. If it’s clicking, a credits plan unlocks more depth and style options. If you want help figuring out prompt styles or pacing visuals via chat, I’d be glad to guide you.
