Seduced AI Video Generator: My Unfiltered Thoughts
Key Points:
- Seduced AI has taken that leap, offering a platform that doesn’t just dabble in still images, but moves into dynamic, NSFW video creation.
- Seduced AI Video Generator is a premium tool that lets you create high-quality, AI-generated videos from a simple text prompt.
- It stands out because it delivers exceptional realism and smooth motion, offers multiple HD model versions, and gives you full creative control.
How to generate videos with Seduced AI?
Step 1 – Choose the Video mode, AI model & Extension/s
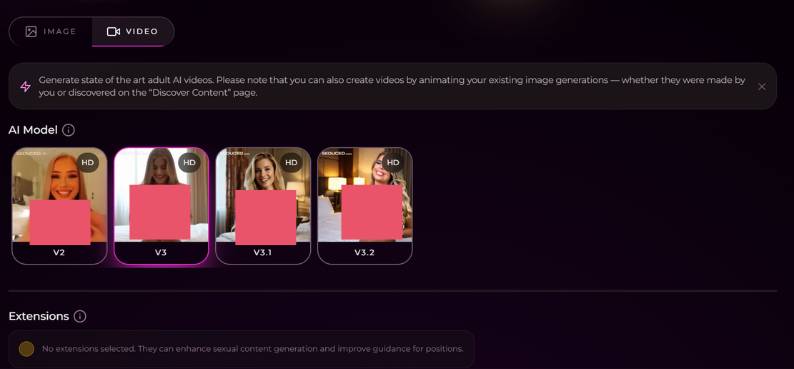
Switch to the “VIDEO” tab.
In the top left corner are two tabs, IMAGE and VIDEO. Tap VIDEO to let the app know you’re trying to produce video content instead of a still image.
Read the helper banner. There’s a banner below the tabs that explains you can:
- Create new AI clips with a text prompt.
- Or bring your picture generations (from this app or ones you found on the “Discover Content” page) to life.
Choose an AI Model
Under “AI Model” will be several teasers cards (like V2, V3, V3. 1, V3. 2) with a small “HD” label. Every card is a unique video model/style.
Click on a card to choose it – the picked one has a coloured border. Use this to see which one suits the style you’re after (such as softer, sharper, more stylised etc).
Extensions (optional)
Below the model cards, you will also find an “Extensions” section.
When there is no extension running, it will have a note that says something like “No extensions selected. They can support better content creation or provide more guidance on how to fill positions.”
Then, when available, here is where you’d turn on additional features or guidance tools for more advanced control.
After you’ve selected your Video mode, AI model and any extensions, swipe down to get to the next screen.
Step 2 – Write your Imagine/Prompt
Up next is the big box that reads, “Imagine (prompt).
Locate the prompt field
It is a wide, single-line text box with the label “Imagine (prompt)” and an “i” icon indicating info.
Below you’ll find a character counter (e.g., “139 characters”) that lets you know when your prompt is long enough.
Enter your description
Write a concise, detailed description of what you would like in your video, ie:
- Who or what is in the scene (character, object, environment).
- Their appearance (hair, clothing, style).
- Actions or movements.
- Mood and facial expression.
- Location and background.
- Camera Framing (CU, FB, WS…etc…)
Guided by the i-symbol
Hover/Click the “i” for tips on how prompts work in this app (the icon means there’s more help available here).
The best prompts are specific but not overburdened. Imagine: “Who is there doing, at what place, in what mood, and how seen?”
Step 3 – Select Style helper & video setting
Beneath the prompt, you customize how your video will look and what its quality will be.
3.1 Style helper (optional)
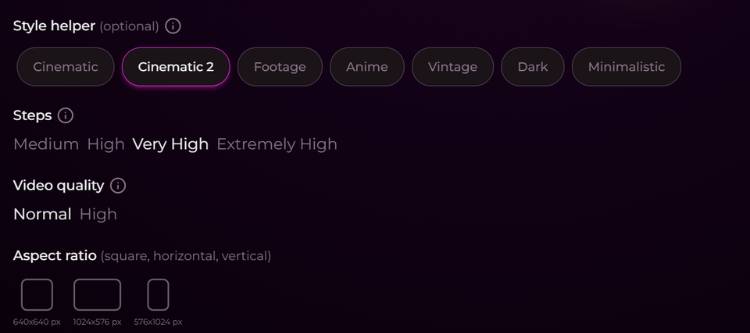
You will then see a line of pill-shaped buttons called Style Helper:
- Cinematic
- Cinematic 2
- Footage
- Anime
- Vintage
- Dark
- Minimalistic
Click either to choose the visual style that steers the model:
- Cinematic / Cinematic 2 – cinematic effect, more dramatic lighting and camera feel.
- Footage – closer to what camera footage looks like.
- Anime – stylised, animation-like look.
- Hippies – vintage colours and contrast/all that jazz.
- Dark – moodier, low-key lighting.
- Minimalistic – cleaner, simpler visuals.
A thin border is shown around the style that you’ve selected.
3.2 Steps
Underneath the Style helper, you will see “Steps”, which has a few options:
- Medium
- High
- Very High
- Extremely High
This is often what determines how many refinement steps the AI system is allowed:
- Medium/High – faster gens, good for fast draft tuning.
- Very High / Extremely High – slower but with generally greater detail and stability in results.
- Choose Very High or above whenever quality is more important than speed.
3.3 Video quality
Below comes “Video quality” with two options:
- Normal
- High
Use:
- Normal when doing fast previews or experimenting a lot.
- High when you’d like your prompt to sit cleanly with the final video.
3.4 Aspect ratio
At the very bottom of this section, you will have the Aspect ratio with optional clips and labels such as : 3 x5 mini-frames, then mini-square frames.
- 640 × 640 px – square (good for general social) 488 JPG.
- 1024 × 576 px – horizontal / landscape (ideal for desktop, YouTube type content).
- 576 × 1024 px – vertical (great for TikTok/Reels/Shorts).
Tap the frame that corresponds to where you want to share the video. After style, steps, quality and aspect ratio are set, it’s time for the final controls.
Step 4 – Adaptations, Length and Privacy
At the last step, you get to choose how many versions and the length of your video.
4.1 Variations
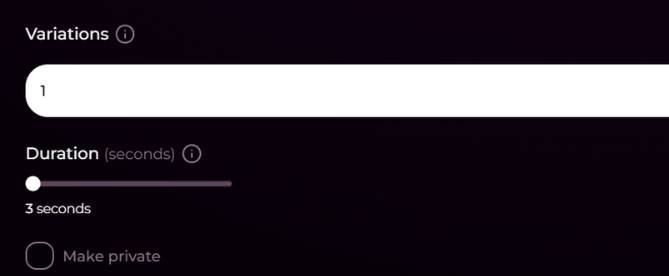
You will find at the top “Variations” with a text input (defaulting to e.g. “1″) and an info icon.
Variations = how many unique videos the app will create from your prompt and settings.
Type 1 for a single result or a larger number if you wish to view multiple alternative clips (this will consume more credits/time).
4.2 Duration (seconds)
Below is “Duration (seconds)” with:
A slider to adjust length.
“(e.g. ‘3 seconds’)” A numerical label below it that changes as you drag 2.
Use this to decide how long your video should be:
Short (2–3 seconds) if you need to test a loop, an avatar or anything short.
5+ Seconds up to a few weeks if supported for more advanced movement.
Slide to the left for shorter clips, and to the right for longer ones.
4.3 Make private
In the lower, a checkbox is labeled “Make private”:
Tick Make private if you do not wish your video to be featured in any public/community gallery.
Uncheck it if you’re comfortable with the shared material remaining discoverable (given whatever the service’s rule on sharing may be).
4.4 Generate your video
Then, press the main Generate / Create button (this will typically be found either below or adjacent to these controls in your interface).
The app will then:
- Take your prompt.
- Add your desired AI Model, style, steps, quality and aspect ratio.
- Then render that selected number of variations at that specified length of time.
Your finished videos should appear in your gallery or results section, after processing, where:
- Preview playback.
- Download the file.
- Regenerate with minor modifications to prompt or settings if not satisfied.
What Makes Seduced Different?
Most platforms flirt with boundaries, giving you slightly risqué or stylized animations, but Seduced leans into full-blown, explicit content. It’s not watered down, not “suggestive only”—we’re talking uncensored AI video generation that looks and feels like the real deal.
The kicker? You’re in control. Instead of relying on static templates, you can feed in prompts, character styles, and scenarios, and Seduced builds out videos tailored to your preferences.
That personalization element is what makes people stick around—it feels made for you, not for some generic audience.
Experience Seduced AI Video Generator
Key Features at a Glance
| Feature | What It Means for You | My Take |
| Uncensored AI Videos | Full explicit control with no heavy censorship filters. | Finally, a platform that doesn’t play coy. |
| Prompt Customization | Choose scenarios, appearances, positions, and more. | Think “build-your-own fantasy” but in motion. |
| Realistic Motion AI | Smooth, natural-looking animations, avoiding robotic vibes. | Way better than old-school CGI loops. |
| HD Rendering | Crisp detail, not pixelated fuzz. | The difference between “meh” and jaw-dropping. |
| Privacy Options | Encrypted user data & discreet usage. | Critical, given the sensitive nature. |
The Experience
When you dive in, it doesn’t feel like some clunky experiment—you get a sleek dashboard where creating a video is almost as simple as generating an image.
Pick your style, write your scenario (yes, the more descriptive you are, the better the output), and then just wait for the magic to render.
Is it instant? No. Quality video generation takes time. But the wait is worth it when you see the final cut—smooth motion, skin textures that don’t fall into the uncanny valley, and a general sense of polish that you just don’t see in smaller platforms.
The Pros and Cons
| Pros | Cons |
| Full uncensored NSFW video generation | Render times can be long |
| High customization (characters, scenarios) | Not free—premium needed for the good stuff |
| More realistic than competitors | Heavy prompts sometimes glitch animations |
| Privacy built in | Can be overwhelming for first-time users |
Why People Are Talking About It
Here’s the thing—AI video generators aren’t exactly new, but the majority of them play it safe. Seduced doesn’t. It’s carving a niche in the NSFW space by leaning into what people actually want: freedom, control, and authenticity in the videos they generate.
There’s also an emotional layer here. For some, it’s just about fantasy. For others, it’s about companionship, experimenting with what they can’t in real life, or even creative exploration in adult storytelling.
You’d be surprised at how much of this overlaps with intimacy, self-expression, and human psychology.
Should You Try It?
If you’ve only ever messed around with AI image generation and wondered if video could really capture the same level of realism—Seduced answers that question. It’s not flawless, but it’s bold, uncensored, and way ahead of most competitors in this space.
I’ll be real: it’s not a tool for everyone. But if you’re already curious, already leaning into the idea of exploring uncensored AI video generation, then Seduced is one of the platforms you’d probably regret not checking out at least once.
